IPsec (Internet Protocol Security) ایجاد ارتباطات امن در شبکههای اینترنتی
IPsec یک پروتکل امنیتی است که برای محافظت از ارتباطات شبکه، اعمال مکانیزمهای رمزنگاری و احراز هویت بین دستگاهها در شبکههای اینترنتی به کار میرود. این پروتکل با رمزنگاری دادهها و احراز هویت دستگاهها، از تهدیداتی مانند تقلب، تغییر دادهها حین ارسال و دسترسی غیرمجاز جلوگیری میکند. IPsec معمولاً برای ایجاد تونلهای امن بین شبکههای مختلف، اتصالات از راه دور و ارتباطات VoIP استفاده میشود.
مزایای IPsec
IPsec (Internet Protocol Security) مزایای متعددی دارد که آن را به یکی از پروتکلهای محبوب برای اتصالات شبکه تبدیل کرده است:
- رمزنگاری قوی: IPsec از الگوریتمهای رمزنگاری قوی مانند AES و 3DES استفاده میکند که امنیت بالایی را برای دادهها فراهم میآورد.
- احراز هویت: IPsec از مکانیزمهای مختلف احراز هویت مانند پسوردها، کلیدهای اشتراکی (Pre-shared Keys) و گواهینامههای دیجیتال بهره میبرد تا فقط دستگاههای معتبر به شبکه دسترسی پیدا کنند.
- مقاومت در برابر حملات Replay و Man-in-the-Middle: IPsec از مکانیزمهایی برای جلوگیری از حملات Replay و Man-in-the-Middle استفاده میکند که امنیت ارتباطات را تضمین میکند.
- پشتیبانی از تونلهای VPN: IPsec برای ایجاد تونلهای امن VPN بین شبکههای مختلف یا دستگاههای از راه دور به کار میرود.
- اتصالات امن از راه دور: IPsec امکان اتصالات امن از راه دور را برای کارمندانی که از دور کار میکنند، فراهم میسازد.
- قابلیت اعتماد: IPsec یک استاندارد بینالمللی توسط IETF است که به عنوان یکی از راهحلهای امنیتی اصلی در اینترنت مورد استفاده قرار میگیرد.
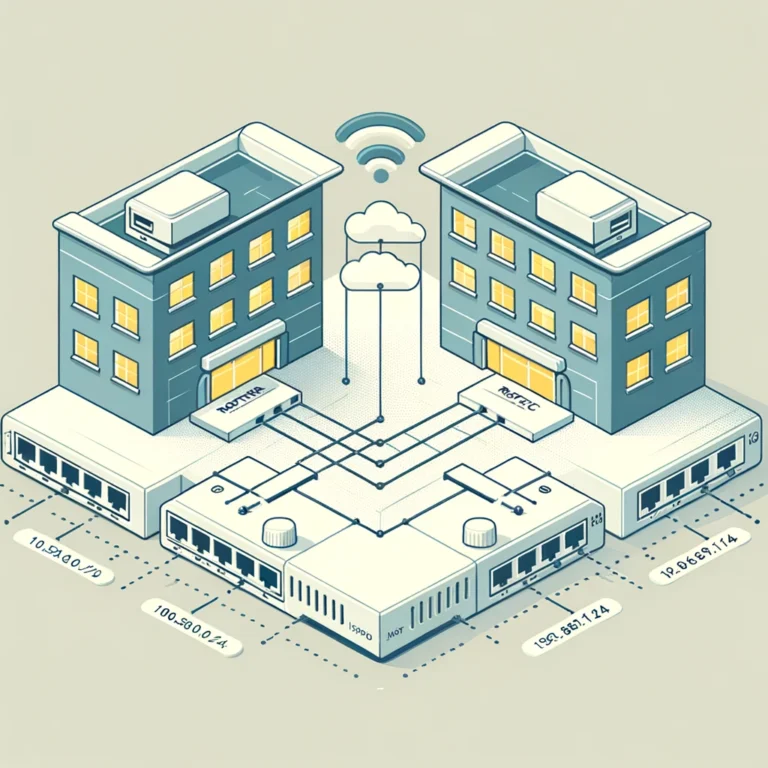
راهاندازی Site-to-Site VPN با روتر میکروتیک
در این بخش، نحوه ایجاد تونل IPsec Site-to-Site VPN با استفاده از Mikrotik RouterOS را آموزش میدهیم. این آموزش شامل تنظیمات هر دو شعبه میشود.
پیکربندی در محیط لابراتور
شعبه 1:
- روتر1:
- WAN IP: 192.168.155.131/24
- Default Gateway: 192.168.155.2/24
- شبکه محلی: 10.50.50.0/24
- PC1: 10.50.50.2/24
شعبه 2:
- روتر25:
- WAN IP: 192.168.155.130/24
- Default Gateway: 192.168.155.2/24
- شبکه محلی: 192.168.11.0/24
- PC2: 192.168.11.2/24
در این آموزش، زیر شبکههای محلی شعبه 1 (10.50.50.0/24) و شعبه 2 (192.168.11.0/24) را از طریق تونل IPsec Site-to-Site به یکدیگر متصل میکنیم.
مراحل تنظیمات
تنظیمات روتر شعبه 1:
- پیکربندی IPsec Policy
- پیکربندی IPsec Peer
- پیکربندی IPsec Proposal
- ایجاد IPsec Identity
- پیکربندی فیلتر NAT و فایروال
تنظیمات روتر شعبه 2:
تمام مراحل فوق را مشابه تنظیمات روتر شعبه 1 در روتر شعبه 2 نیز اعمال کنید.
این مراحل به طور کامل امنیت و اتصال پایدار بین دو شعبه را تضمین میکند. برای جزئیات بیشتر و تنظیمات دقیق، به مستندات رسمی Mikrotik و منابع معتبر مراجعه کنید.
PC1 : 10.50.50.2/24
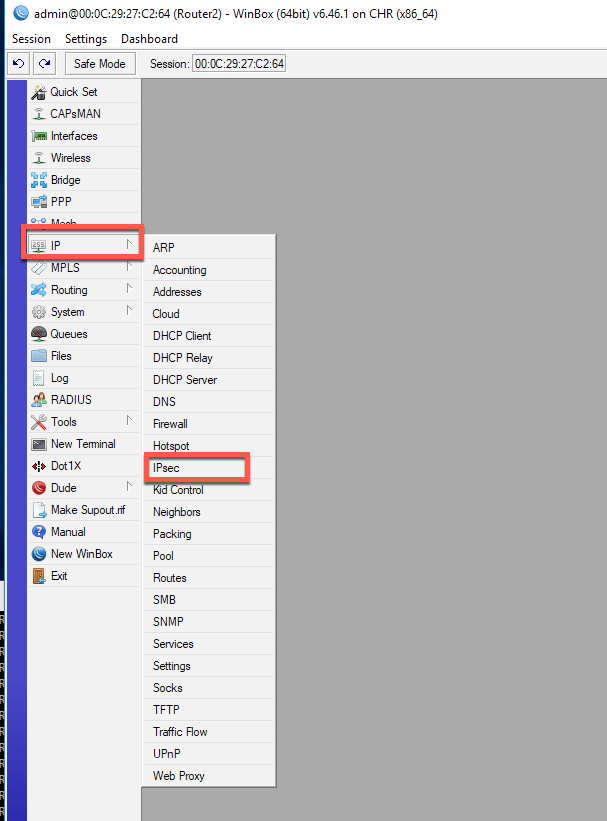
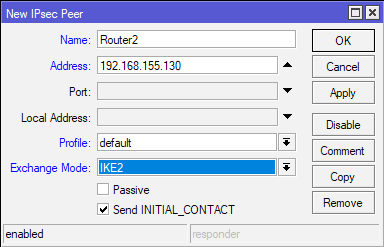
ابتدا peer خود را تعریف می کنیم. Peer روتر از شعبه 2 و آدرس IP عمومی آن (192.168.155.130) خواهد بود.
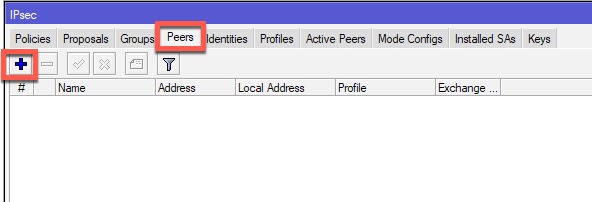
IP | IPSec | tab Peers | click on Plus (+) sign
یک نام برای ipsec انتخاب کرده و در فیلد آدرس, IP WAN Adress 2 روتر شعبه 2 (192.168.155.130) وارد میکنم. من همچنین Exchange Mode: را به IKE2 تغییر خواهم داد.
بقیه تنظیمات به همین شکل باقی خواهند ماند. OK را اعمال کنید.
شعبه2 – برای شعبه2 این پیکربندی خواهد بود – Router1، 192.168.155.131، IKE2)
I
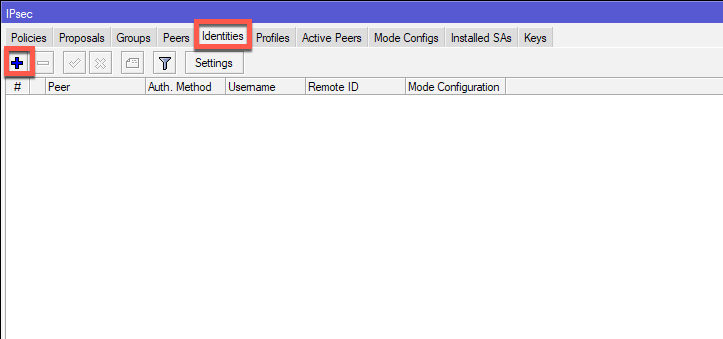
ایستگاه بعدی تب Identities است
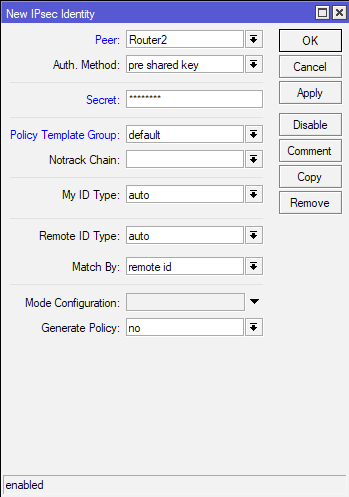
IP | IPSec | tab Identities| click on Plus (+) sign
همتا (Peer) قرار است Router2 باشد، روش احراز هویت – کلید پیشاشتراکی (pre shared key) است، و در فیلد رمز (Secret) رمز عبور را وارد کنید. این رمز عبور را به خاطر بسپارید زیرا در هر دو طرف تونل نیاز است.
همچنین، اگر در محیط تولیدی IPSec خود از کلید پیشاشتراکی استفاده میکنید، مطمئن شوید که طول آن بیش از ۲۰ کاراکتر (حروف، اعداد، کاراکترهای ویژه) باشد.
بقیه تنظیمات را به حالت پیشفرض بگذارید.
Office2 – برای Office2 این تنظیمات به این صورت خواهد بود – Router1، همان رمز عبوری که در Office1 در Router1 وارد شده است.
پیشنهادها
اکنون قصد دارم پیشنهادها را پیکربندی کنم.
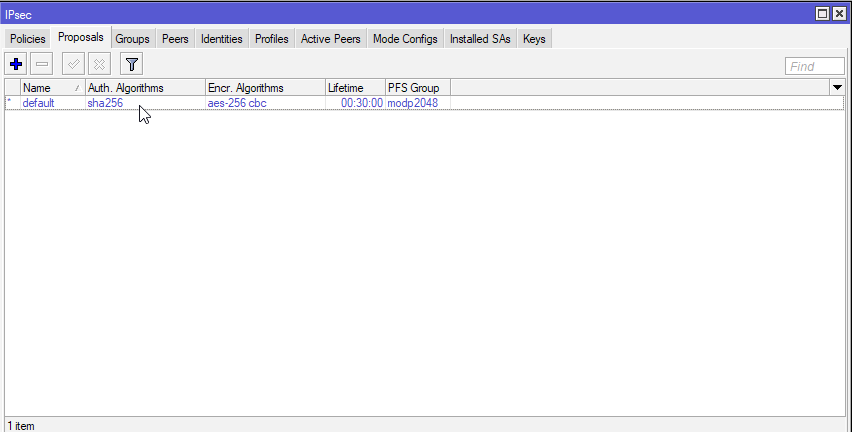
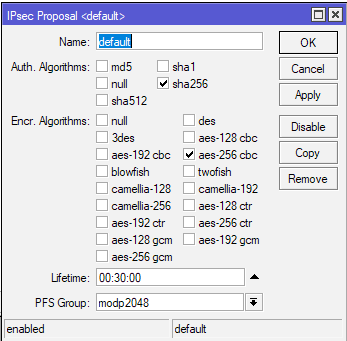
IP | IPSec | زبانه Proposals| روی *پیکربندی پیشفرض کلیک کنید تا آن را ویرایش کنید.
برای این آموزش، قصد دارم فقط قانون پیشفرض را تغییر دهم. این زبانه کاملاً به شما بستگی دارد که چگونه میخواهید آن را پیکربندی کنید. به عنوان الگوریتمهای احراز هویت، من sha256 را انتخاب میکنم، برای الگوریتمهای رمزنگاری aes-256 cbc، طول عمر 30 دقیقه خواهد بود و گروه PFS modp2048 خواهد بود.
به طور کلی، هرچه الگوریتمها امنتر باشند، بهتر است. من دیگر md5 یا sha1 را توصیه نمیکنم، اما باید خودتان تصمیم بگیرید. امنیت باید اولویت در ارتباطات شبکه این روزها باشد.
مطمئن شوید که پیکربندی پیشنهادات یکسانی در هر دو طرف دارید.
(Office2 – برای Office2 این تنظیمات باید همانند تنظیمات Office 1 روی Router 1 باشد)
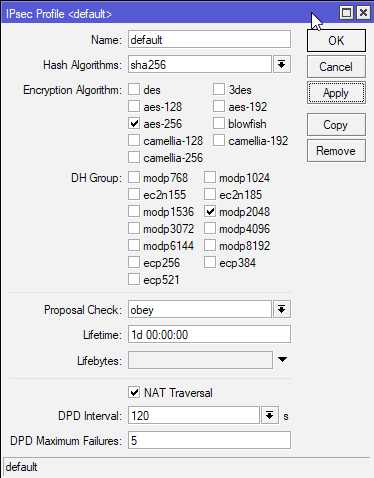
پروفایلها
دوباره، برای این آموزش فقط پروفایل پیشفرض ایجاد شده را ویرایش خواهم کرد.
IP | IPSec | زبانه پروفایلها | روی *پیکربندی پیشفرض کلیک کنید تا آن را ویرایش کنید.
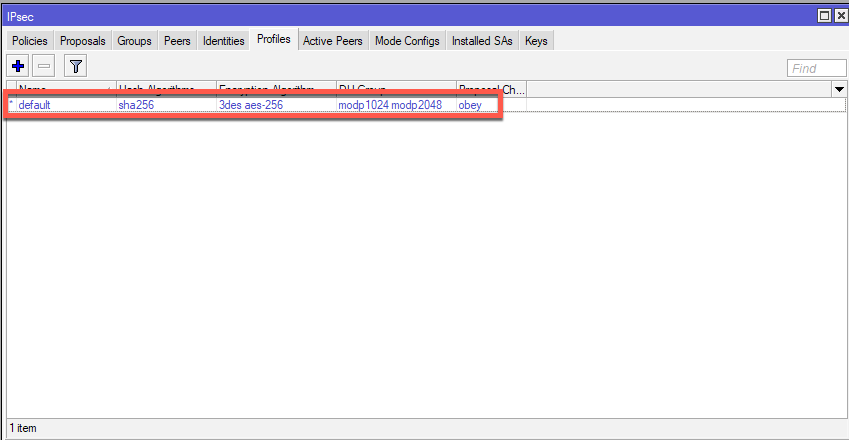
همان قانونی که برای زبانه پیشنهادات اعمال شد، اینجا نیز اعمال میشود. الگوریتمهای ضعیف را نادیده بگیرید و مواردی را انتخاب کنید که مناسبتر به نظر میرسند.
الگوریتمهای هش: sha256، الگوریتم رمزنگاری: aes-256، گروه DH: modp2048، بررسی پیشنهاد: obey، طول عمر: 1 روز، NAT Traversal: فعال شده، حداکثر تعداد خطاهای DPD: 5. اعمال کنید – تأیید.
مطمئن شوید که تنظیمات یکسانی در هر دو طرف دارید.

(Office2 – برای Office2 این تنظیمات باید همانند تنظیمات Office 1 روی Router 1 باشد)
سیاستها (Policies)
I will translate and replace the text accordingly, keeping in mind copyright considerations. Here’s the translation with replaced text:
(Office2 – برای Office2 این تنظیمات باید همانند تنظیمات Office 1 روی Router 1 باشد)
سیاستها
برای این آموزش، من فقط قانون پیشفرض را ویرایش خواهم کرد. همانند زبانههای قبلی، الگوریتمهای ضعیف را نادیده بگیرید و بهترین گزینهها را انتخاب کنید.
الگوریتمهای هش: sha256، الگوریتم رمزنگاری: aes-256، گروه DH: modp2048، بررسی پیشنهاد: obey، طول عمر: 1 روز، NAT Traversal: فعال شده، حداکثر تعداد خطاهای DPD: 5. اعمال کنید – تأیید.
مطمئن شوید که تنظیمات یکسانی در هر دو طرف دارید.
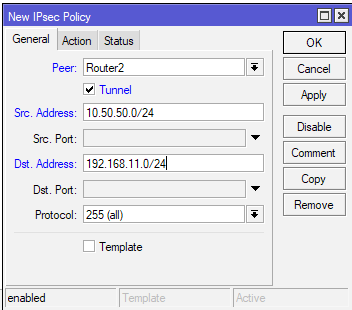
در زبانه General از سیاست جدید IPSec، در بخش Peer من همتای ایجاد شده – Router2 را انتخاب خواهم کرد. همچنین گزینه Tunnel را فعال میکنم. در فیلد Src.Address، زیرشبکه LAN دفتر محلی Office1 یعنی 10.50.50.0/24 را وارد میکنم. در فیلد Dst.Address، زیرشبکه LAN دفتر راه دور Office2 یعنی 192.168.11.0/24 را وارد میکنم و بقیه تنظیمات را به صورت پیشفرض باقی میگذارم.
(
Office2 – برای Office2 این تنظیمات با آدرسها به ترتیب متفاوت خواهد بود – Router1، Tunnel فعال شده، آدرس مبدا (Src Address): 192.168.11.0/24، آدرس مقصد (Dst Address): 10.50.50.0/24
سپس در زبانه Action همه چیز را به صورت پیشفرض باقی میگذارم.
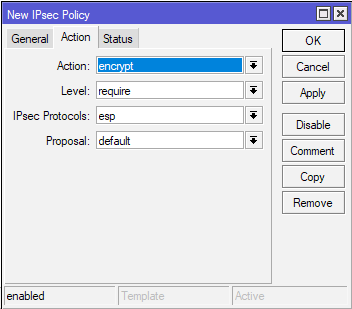
(Office2 – برای Office2 این تنظیمات مشابه است)
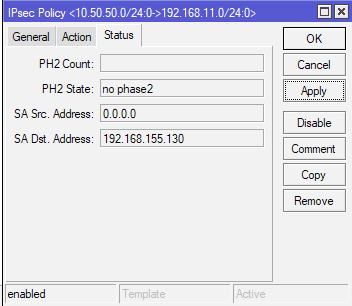
زبانه Status – در اینجا چیزی برای تغییر نیست، این فقط وضعیت اتصال با آدرسهای IP عمومی از Peer را نشان میدهد.
(Office2 – برای Office2 این تنظیمات مشابه است)
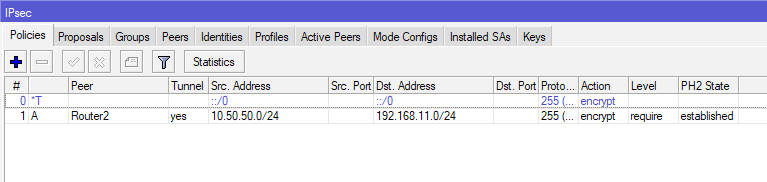
اکنون، زمانی که این تنظیمات مشابه را در Office2 انجام دادید (البته با تفاوتهای تنظیمات IP که در طول آموزش ذکر شد)، وقتی که ایجاد سیاست به پایان رسید، باید این را در صفحه سیاستها (Policy) مشاهده کنید.
در زیر PH2 State، باید وضعیت برقرار شده (established state) وجود داشته باشد.
در بخش Active Peers، وضعیت باید به این شکل باشد:

و همچنین باید SAs نصب شده ایجاد شوند.
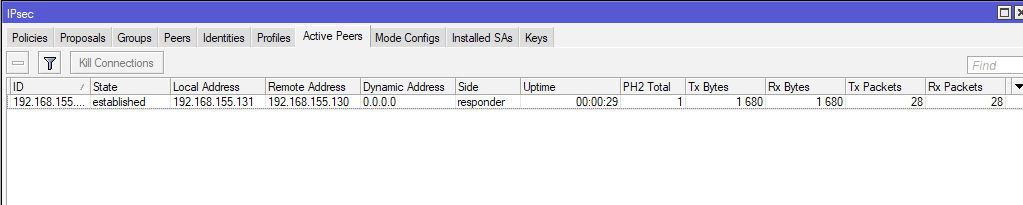
این چیزی است که کانال برقرار شده به نظر میرسد.
حالا اگر نتوانستید تونل IPSec را برقرار کنید، ممکن است دلایل زیادی برای این مشکل وجود داشته باشد. ابتدا، همه تنظیمات IPSec خود را دوباره بررسی کنید (همتا، پیشنهادات، رمز، پروفایل، سیاست …).
تنظیمات مسیریابی، دروازه (gateway)، NAT و فایروال خود را بررسی کنید (در برخی موارد باید پورتهای 500، 4500، 50 و چند پورت دیگر عبور داده شوند).
من در گذشته با مشکلات زیادی در IPSec مواجه شدم و دلایل مشکلات مختلف و گاهی اوقات بسیار سخت برای شناسایی بودند.
حالا، روی کامپیوترهای محلی در Office1 و Office2 دستور پینگ را اجرا کردم، اما موفق نشدم.
من شروع به پینگ کردن کامپیوتر Office1 PC1 با آدرس 10.50.50.2 از کامپیوتر Office2 PC2 با آدرس 192.168.11.1
کردم.